Creating your own Adirondack chair can be a rewarding experience that brings a touch of rustic charm to your outdoor space. I made this post because I know how fulfilling it feels to build something with your own hands, especially when you’re crafting a piece of furniture that will serve you for years. Whether you’re lounging with a book or sipping coffee in your garden, an Adirondack chair is a perfect companion.
If you’re a beginner woodworker or someone who simply loves DIY projects, this guide is for you. You may have a vision of how you want your garden seating to look but might need some inspiration or guidance. This post offers 11 simple Adirondack chair drawing ideas that can help you bring your dreams to life. You’ll find styles that range from classic to modern, ensuring there’s something to suit your taste and skill level.
By the end, you’ll not only have a collection of unique chair designs to inspire your next project but also practical tips on how to execute these woodworking plans. You’ll learn how to create stunning outdoor furniture that complements your garden and provides comfortable seating for you and your guests. Let’s dive into these ideas and transform your outdoor space together!
Key Takeaways
– Explore 11 simple Adirondack chair drawing ideas that cater to all skill levels, perfect for inspiring your next DIY project.
– Discover various designs including classic, modern, and multi-functional, allowing you to choose a style that fits your taste.
– Learn about specific features such as rocking mechanisms, foldable designs, and built-in storage to maximize comfort and functionality.
– Find practical tips on how to execute these woodworking plans, making your DIY chair project manageable and enjoyable.
– Get inspired to personalize your Adirondack chair, ensuring that your outdoor furniture reflects your unique style and enhances your garden setting.
1. Classic Adirondack Design

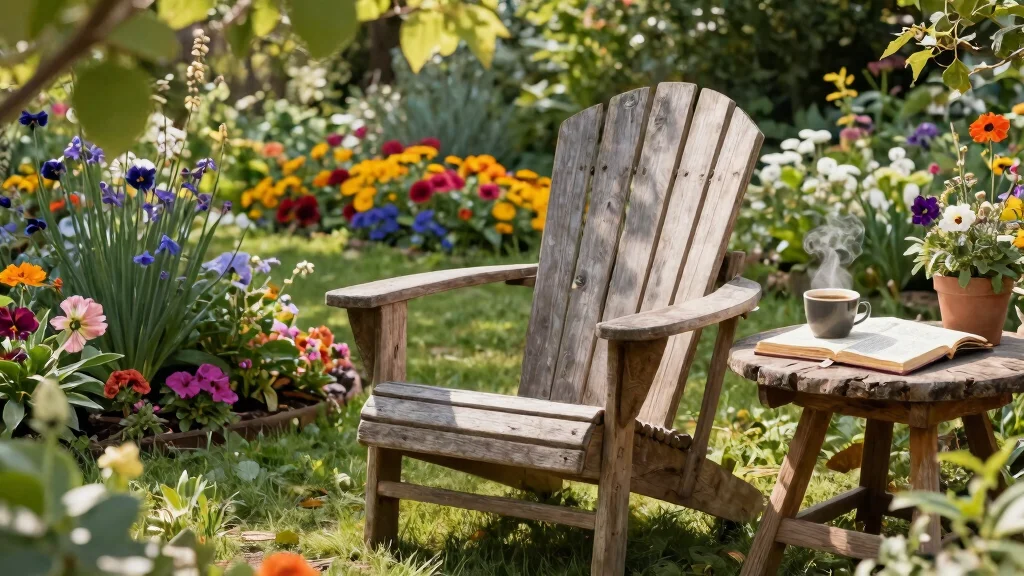
The classic Adirondack chair design stands out for its low, wide structure that invites relaxation. Featuring a gently sloped backrest and broad armrests, this timeless piece encourages you to unwind in comfort. As you sketch, pay attention to how the seat’s low profile pairs with optional footrests, enhancing its inviting charm.
Using reclaimed wood can bring a rustic vibe, allowing you to showcase the natural grain in your drawings. Remember, the beauty lies in its straightforward lines and robust build, so keep your sketches relatable and accessible.
Consider these elements to enhance your design:
– Pair cedar or redwood for durability and weather resistance.
– Use natural wood finishes or soft pastel colors for a cheerful touch.
– Incorporate a drink holder in an armrest for added convenience.
This classic design not only serves as a staple in outdoor furniture but also adapts beautifully to various garden styles.
2. Sleek Modern Take

Transforming the Adirondack chair into a modern masterpiece can invigorate your outdoor space. With its cleaner lines and minimalist aesthetic, this design often features a taller backrest that balances style and comfort. When sketching, think about adding angular shapes to the armrests and seat for a contemporary flair.
Materials like composite wood or metal can elevate the industrial vibe, offering durability while staying on-trend. Consider using budget-friendly options to keep costs down while maintaining style.
Explore these ideas for your modern design:
– Incorporate straight lines instead of curves for a sleek look.
– Use a matte finish in monochrome shades for sophistication.
– Accessorize with a simple side table for enhanced functionality.
This modern Adirondack chair is perfect for contemporary gardens, blending traditional comfort with cutting-edge design.
Difficulty Rating & Requirements
Overall Difficulty Rating: Medium
This project is rated as Medium difficulty. It requires some basic woodworking skills and familiarity with tools. If you’re a beginner with a little experience, you will find these Adirondack chair drawing ideas manageable. However, more complex designs may challenge you, making it crucial to choose a plan that matches your skill level.
Time Estimate:
⏱ Estimated time: 10-20 hours
– Planning and Sketching (2-4 hours): Start by reviewing the chair designs and choosing the one you want to create. Sketching your ideas is essential.
– Material Preparation (3-5 hours): Gather your materials and prepare the wood as needed. Cutting pieces to the right size takes time, so be patient.
– Construction (5-10 hours): This phase can vary based on complexity. Simple designs will take less time, while more intricate ones will require additional effort.
Skill Requirements:
– Required skills: Basic woodworking, measuring, cutting, and assembly skills are necessary for this project.
– Beginner-friendly: Yes! If you follow the plans closely and take your time, you can learn as you go.
– Skills that can be learned include measuring and cutting wood accurately, while skills like advanced joinery may require more experience.
Tools & Materials Needed:
🧰 Essential items checklist:
– Circular saw or miter saw (Required): Essential for cutting wood pieces accurately.
– Drill with bits (Required): Needed for making holes and securing screws.
– Measuring tape (Required): To ensure accurate dimensions for your chair.
– Wood glue (Required): Helps secure joints for a sturdy build.
– Sandpaper (Optional): Smooths the surface for a professional finish.
– Paint or wood stain (Optional): Personalizes your chair and protects the wood.
– Screwdriver (Required): Necessary for assembling the chair components.
– Clamps (Optional): Useful for holding pieces together while the glue dries.
Step-by-Step Overview:
1. Design Selection (2-4 hours): Choose your preferred Adirondack chair design from the drawing ideas. Make adjustments if necessary to suit your style.
2. Material Gathering (3-5 hours): Head to your local hardware store or lumber yard to gather all required materials. Make sure to check for wood quality and type.
3. Cutting and Shaping (3-6 hours): Carefully cut the wood according to your design plans. Make sure to measure twice before cutting to avoid mistakes.
4. Assembly (2-4 hours): Follow your sketches to assemble the chair. Use wood glue and screws to secure all pieces firmly.
5. Finishing Touches (1-2 hours): Sand down rough edges and apply paint or stain to protect the wood and enhance its appearance. Allow it to dry completely.
Professional vs DIY:
Hiring a professional to build an Adirondack chair can cost anywhere from $150 to $500, depending on the design and materials used. On the other hand, a DIY project can cost you between $50 to $150, making it a budget-friendly option. If you’re motivated to learn and enjoy working with your hands, tackling this project yourself can also provide a sense of accomplishment and a unique piece for your garden.
3. Curved Backrest Inspiration

Elevate the classic Adirondack chair with a curved backrest, creating an inviting and warm aesthetic. The gentle curve not only enhances comfort but also adds a touch of whimsy, making it a delightful addition to any garden. When sketching this design, experiment with the flow of the backrest into the seat and arms, and consider adding contrasting colors for a playful touch.
This softer approach invites creativity, allowing for unique expressions in your garden. Don’t forget to emphasize sturdy support in your designs to ensure durability.
Consider these aspects in your sketches:
– Integrate double curves for added style and comfort.
– Choose vibrant colors like teal or coral for a cheerful garden vibe.
– Sketch in robust support under the seat to guarantee stability.
This design enhances casual garden settings, offering a cozy nook surrounded by nature.
4. Rocking Adirondack Chair

Introducing movement to the Adirondack chair with a rocking feature can transform your outdoor seating experience. This playful variation enhances relaxation while adding a whimsical element to your garden. Sketch the curvature of the rockers to harmonize with the chair’s overall shape and focus on stability to prevent tipping.
Incorporating extra support in your design will ensure a safe and enjoyable rocking experience.
Here are some tips for your rocking chair design:
– Include wider rockers to promote better balance.
– Opt for heavier woods to enhance stability during rocking.
– Use weatherproof finishes to prolong the chair’s life outdoors.
This rocking chair offers a serene spot for enjoying nature while swaying gently in the breeze.
5. Loveseat Adirondack Chair

Share the joy of relaxation with a loveseat version of the Adirondack chair. This design accommodates two people comfortably, making it perfect for enjoying garden views together. When sketching, ensure that the proportions remain inviting while keeping the sturdy structure intact. Adding a central table between the seats for drinks or snacks can enhance its functionality.
This communal design promotes togetherness, making it ideal for family gatherings or quiet moments outside.
Keep these elements in mind for your loveseat design:
– Create wider seats and backrests for added comfort.
– Incorporate small decorative details, like engraved armrests.
– Ensure the chair is well-anchored for stability.
This loveseat encourages outdoor bonding and creates a welcoming space for shared moments.
6. Folding Adirondack Chair

The folding Adirondack chair merges traditional design with modern convenience, making it perfect for smaller outdoor areas. This design allows for easy storage when not in use, providing a practical solution for compact gardens. As you sketch, focus on the hinge mechanism that facilitates folding while ensuring stability during use.
Incorporating reinforced joints will maintain the integrity of the chair for lasting use.
Here are some features to consider in your design:
– Use lightweight materials for effortless movement.
– Ensure the design folds flat without sacrificing comfort.
– Opt for bright colors to create a cheerful summer atmosphere.
This chair is perfect for picnics or gatherings, providing flexibility and ease.
7. Adirondack Chair with Canopy

Enhance your Adirondack chair with a canopy, creating a shaded retreat that stands out in your garden. This addition is perfect for those hot days when you want to enjoy the outdoors without harsh sunlight. Focus on how the canopy attaches securely, balancing both functionality and visual appeal in your sketches.
Adjustable heights for the canopy can provide a customizable experience, allowing you to optimize comfort.
Consider these design elements:
– Choose weather-resistant fabric for durability.
– Match the canopy’s color with the chair for a cohesive look.
– Ensure the canopy pivots for shade at different angles.
This design transforms your garden seating into a stylish oasis where you can relax under the shade.
8. Upcycled Adirondack Chair

For sustainability enthusiasts, an upcycled Adirondack chair offers a fantastic project opportunity. Using reclaimed materials like old pallets or barn wood not only minimizes waste but also adds unique character to your chair. When sketching, think about how different wood textures can harmonize, potentially creating a mosaic effect that highlights the beauty of upcycled materials.
Emphasizing quality and durability in recycled materials is key, so be sure to choose wisely.
Explore these creative ideas for your upcycled design:
– Incorporate unique features like wine holders or built-in planters.
– Use natural oils or stains to enhance the wood grain.
– Always check for eco-friendly materials to ensure longevity.
This project not only beautifies your garden but also tells a story of sustainability and creativity.
Fun fact: Upcycling pallets can reduce wood waste by up to 60%, giving your Adirondack chair a one-of-a-kind mosaic look. As you explore adirondack chair drawing ideas, plan textures and grain to harmonize materials, turning scrap into durable, stylish seating that lasts.
9. Adirondack Chair with Storage

Imagine a chair that combines comfort with practicality—a storage Adirondack chair. This design features built-in storage beneath the seat, perfect for keeping gardening tools or cushions neatly tucked away. When sketching, highlight how the storage compartment remains easily accessible without compromising the chair’s aesthetic.
Incorporating waterproof elements will protect stored items from the elements.
Consider these practical features for your design:
– Use a lift-up seat for convenient access.
– Maintain a sleek, integrated design with a natural wood finish.
– Ensure it is waterproof to safeguard your belongings.
This chair helps keep your outdoor area organized while blending style and function seamlessly.
Fun fact: A storage Adirondack chair can cut garden clutter by up to 40%, keeping cushions and tools within reach. Sketch it with a discreet storage lid and waterproof seal, and your adirondack chair drawing ideas stay tidy and practical.
10. Personalized Adirondack Chair

Make your Adirondack chair truly unique with a personalized touch. Whether through custom carvings, painted designs, or chosen colors, this idea allows your creativity to shine. When sketching, think about how your interests can be incorporated into the chair’s design. Consider motifs that resonate with you, like floral patterns, family names, or hand-painted symbols.
Using stencils can provide uniformity, while freehand designs add a personal flair.
Explore these ideas for customization:
– Choose bright, bold hues to make your chair stand out.
– Apply sealants to protect your artwork from the weather.
– Experiment with designs that showcase your style and personality.
This chair becomes a piece of art, merging practicality with your unique expression in the garden.
11. Multi-Functional Adirondack Chair

A multi-functional Adirondack chair incorporates various features, making it perfect for versatile outdoor use. Consider designs that can transform into a chaise lounge or include a pivoting side table for added convenience. As you sketch, reflect the adaptability of the chair, showcasing how it meets different needs effortlessly.
Highlight features like adjustable recline and detachable sections for extra utility.
Keep these versatile elements in mind:
– Emphasize adjustable components for different seating positions.
– Design a foldable side table for practicality.
– Ensure proper cushioning for extended comfort.
This chair is perfect for those wanting to maximize their outdoor experiences while enjoying various activities in the garden.
Turn your adirondack chair drawing ideas into a practical plan: a chair that can become a chaise lounge, with a pivoting side table and detachable sections. Sketch flexible features first, then lock in adjustable recline and portable parts so your design works outdoors.
Conclusion

Creating your own Adirondack chair can be a rewarding project that enhances your garden space. With these inventive drawing ideas, you can personalize your design to fit your style and functional needs. Don’t hesitate to mix and match features from different designs, allowing your creativity to shine.
Whether you opt for a classic design or a modern twist, each chair tells a story while providing a cozy spot to enjoy nature. Now, gather your materials and get sketching! Your dream Adirondack chair awaits!
Note: We aim to provide accurate product links, but some may occasionally expire or become unavailable. If this happens, please search directly on Amazon for the product or a suitable alternative.
This post contains Amazon affiliate links, meaning we may earn a small commission if you purchase through our links, at no extra cost to you.
Frequently Asked Questions
Question: What are some beginner-friendly adirondack chair drawing ideas I can start with for gardening DIY projects?
These adirondack chair drawing ideas are great starting points for your garden. Begin with simple shapes: a broad back, wide armrests, and a slanted seat to capture the classic Adirondack profile. Do 2–3 quick sketches to test proportions, then refine into a basic plan you can translate into woodworking plans for your garden.
Use a grid or light tracing to keep lines straight, and practice varying the backrest angle to see what looks best in your space. Once you’re happy, save the strongest sketch as your reference for future outdoor furniture design ideas and DIY chair projects.
Question: What tools and materials should I gather to turn these adirondack chair drawings into real outdoor furniture?
Gear up with weather-resistant wood—cedar, treated pine, or teak—and exterior-grade fasteners. For beginners, cut parts from 3/4″ stock so the chair feels sturdy but easy to handle. Essentials include a saw (hand saw or miter saw), a drill, an orbital sander, clamps, a carpenter’s square, and exterior stain or sealant for durability.
Keep a simple cut list and label parts according to your drawing ideas. Use your plan as a guide for DIY chair projects and outdoor furniture design to stay consistent.
Question: How can I customize rustic chair sketches to match my garden design and seating needs?
Rustic charm shines when you lean into natural wood tones and straightforward silhouettes. Try variations like wider slats, a lower or higher back, or carved initials. Play with finishes—oil/stain, whitewash, or matte paint—to align with your garden seating ideas.
Document measurements you want to keep in your final woodworking plans, and note which features are easiest for beginners to assemble.
Question: Can I convert these adirondack chair drawing ideas into downloadable, beginner-friendly woodworking plans?
Absolutely. Start by finalizing one or two of your strongest adirondack chair drawing ideas, then turn them into a complete set of beginner-friendly woodworking plans with a cut list, material list, and step-by-step assembly. You can lay out dimensions at full scale on graph paper or use simple CAD tools, then print a 1:1 template to guide cutting and joinery. This makes it easier for DIY chair projects to become real outdoor seating.
Question: What are the standard dimensions for Adirondack chairs, and how can I adjust my drawings for small patios or spacious gardens?
Typical Adirondack chairs aim for a comfortable lounging posture: seat height around 15–17 inches, seat width 20–22 inches, and a backrest that slopes for a relaxed lean. But space and comfort vary, so adjust proportions for small patios or large gardens.
To adapt your drawings, start with a 1:1 scale on paper or print at full size, then scale up or down while keeping the armrests wide and the backrest tall enough for comfort. Measure your space, consider leg and elbow clearance, and test-fit your plan before cutting wood.


![21 Genius Garden Hose Storage Ideas [End the Clutter]](http://nestire.com/wp-content/uploads/2026/04/21-Genius-Garden-Hose-Storage-Ideas-End-the-Clutter-150x150.webp)
![15 Dreamy Canopy Tent Wedding Reception Ideas [Elegant]](http://nestire.com/wp-content/uploads/2026/04/15-Dreamy-Canopy-Tent-Wedding-Reception-Ideas-Elegant-150x150.webp)