Gardening is one of those joys that brings peace and satisfaction, but it can also lead to a cluttered tool shed. If you’ve ever opened your tool shed and felt overwhelmed by the chaos, you’re not alone. This post is here to help you out. We’ve gathered 15 smart tool shed organization ideas that save space and make your gardening experience smoother. You’ll discover clever solutions to keep your tools in order, so you can spend more time gardening and less time searching for what you need.
If you’re a gardening enthusiast looking to maximize every nook and cranny of your shed, this post is for you. Whether you’re a seasoned gardener with tons of tools or a beginner with just a few essentials, these ideas are designed to fit various storage needs. You’ll find inspiration for wall-mounted solutions, vertical racks, and even DIY projects that add a personal touch to your shed.
By the end of this guide, you’ll have a treasure trove of ideas at your fingertips. From space-saving solutions to DIY tips, you’ll learn how to manage your tools efficiently. Say goodbye to clutter and hello to an organized, functional shed that you’ll love to spend time in!
Key Takeaways
– Discover wall-mounted tool organizers that free up floor space and keep your tools within easy reach.
– Learn about vertical garden tool racks perfect for maximizing vertical space in smaller sheds.
– Explore creative uses for repurposed pallets to create unique storage solutions that are both rustic and functional.
– Find out how hanging baskets can neatly store small tools, making them easy to access and organize.
– Get tips on regular maintenance to keep your shed organized and to prevent future clutter from building up.
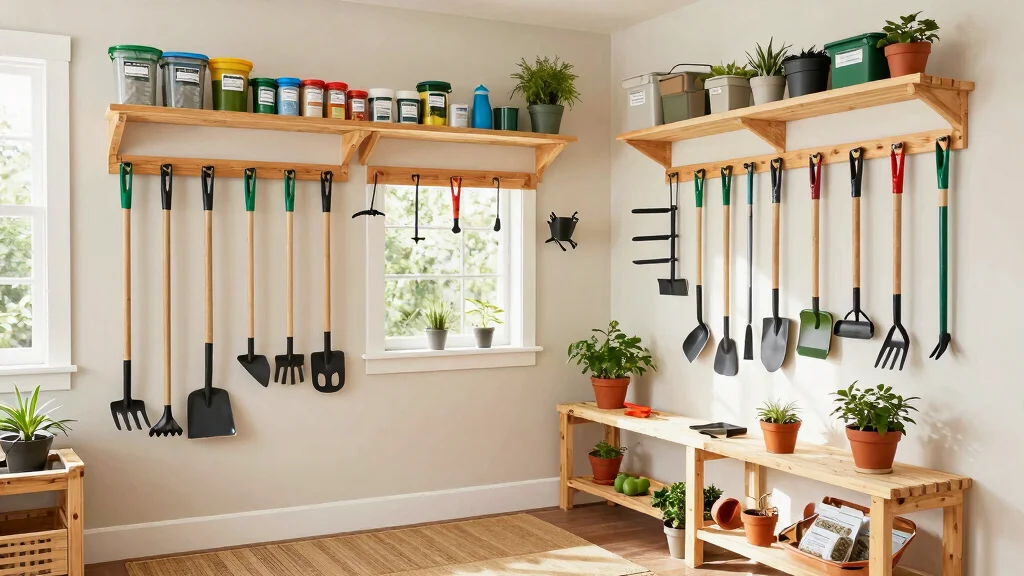
1. Wall-Mounted Tool Organizers

Are you struggling to find tools in your shed? Wall-mounted tool organizers can be your solution. These organizers keep your tools off the floor and neatly hung, making your workspace tidy and efficient. With options like pegboards and magnetic strips, you can customize your setup according to your needs and preferences. Whether you prefer hooks for various tools or magnetic strips for metal items, these organizers transform your space.
Start by assessing the tools you use most frequently and arrange them at eye level for easy access. Group similar tools together to streamline your workflow and save time. For a touch of creativity, consider color-coding your hooks, making it visually appealing and functional.
Key steps to enhance your shed organization:
– Install pegboards: Create a versatile hanging system with custom options.
– Use magnetic strips: Keep metal tools visible and accessible.
– Label sections: Clearly define areas for different tool types.
This organization method not only maximizes your space but also boosts your productivity during gardening tasks.
Wall-mounted tool organizers turn clutter into efficiency. With pegboards and magnetic strips, you quickly see what you need and save time searching. Embrace tool shed organization ideas that keep essentials within reach and your workspace tidy.
2. Vertical Garden Tool Racks

Want to save valuable floor space in your shed? A vertical garden tool rack is the perfect solution. These racks utilize height to store multiple tools in a compact design, making organization simple and effective. Multi-tiered options can store everything from long-handled tools to small gardening gloves. The best part? They keep your tools visible and easily accessible.
When selecting a vertical rack, look for sturdy materials that can withstand outdoor conditions. Some racks even offer adjustable shelves for tailored organization based on your specific needs. This approach not only saves space, but it also encourages regular use and helps maintain an organized environment.
Benefits of integrating a vertical tool rack:
– Maximize vertical space: Keep tools upright and reduce clutter.
– Choose durable materials: Opt for metal or solid wood for longevity.
– Adjustable setups: Customize your rack to fit various tool sizes.
Implementing a vertical tool rack can significantly enhance your shed’s efficiency and organization.
3. Repurposed Pallet Storage

Looking for a creative way to store your tools? Repurposed pallets can serve as innovative storage solutions. Easily modified, pallets can hold tools, pots, or even small plants, providing a rustic charm to your shed. You can position them vertically or horizontally, creating a striking focal point while saving space.
Before using pallets, make sure to sand and finish them for safety. You can also customize the shelves by adding boards for additional levels or compartments. For a personal touch, consider painting the pallets in bright colors that match your style.
Here’s how to make pallet storage work for you:
– Smooth edges: Sand down rough spots for safety.
– Add shelves: Create more space for smaller items.
– Customize colors: Use vibrant paints for a fun look.
Pallet storage is an eco-friendly option that adds character to your tool shed while keeping everything organized.
4. Hanging Baskets for Small Tools

Have small tools and supplies cluttering your workspace? Hanging baskets provide a clever solution for organizing these items. Easily hung from the ceiling or walls, they keep your tools off surfaces while remaining accessible. Perfect for hand tools, seed packets, or gloves, they help maintain a tidy environment.
To use hanging baskets effectively, consider labeling each one to avoid rummaging through them. Mixing different sizes and shapes can create a visually appealing and functional arrangement. Rotate the contents based on gardening seasons to keep your essentials within reach.
Ideas for maximizing hanging baskets:
– Label clearly: Use tags for quick identification.
– Vary sizes: Combine different shapes for functionality.
– Seasonal adjustments: Change contents based on gardening needs.
This organization method not only declutters your shed but also adds a charming touch to your gardening space.
5. DIY Magnetic Tool Holder

Want a simple yet effective way to store your tools? A DIY magnetic tool holder is a great project for your shed. By attaching a strong magnet strip to the wall, you can keep your metal tools visible and within easy reach. This method encourages you to maintain cleanliness and organization in your workspace.
When creating your magnetic tool holder, choose high-quality magnets that can securely hold heavier tools. Install the strip at eye level for convenience, especially near your potting bench. To enhance the aesthetic appeal, consider painting the strip or adding decorative elements that complement your shed’s style.
Tips for crafting your magnetic tool holder:
– Select strong magnets: Ensure they can hold your tools securely.
– Install at eye level: Make access easy while you work.
– Customize appearance: Add paint or decor for visual interest.
This magnetic holder can transform your shed, offering both style and functionality while keeping your tools organized.
Did you know a magnetic tool holder can cut search time by up to 50%? By mounting a strong magnet strip at eye level, you’ll keep essential tools visible and boost tool shed organization ideas every day.
6. Overhead Storage Solutions

Are you making the most of your shed’s vertical space? Overhead storage is an excellent way to utilize the area above you. By installing shelves or a pulley system, you can store rarely used items, freeing up valuable floor space for your gardening tools.
When setting up overhead storage, ensure the brackets are sturdy enough to hold the weight of your items. Using clear bins allows you to see contents easily without needing to pull everything down. Additionally, store out-of-season tools overhead to create more room for your current gardening supplies. br>
Effective strategies for overhead storage:
– Secure brackets: Check that they can support your items.
– Use clear containers: Easily identify contents at a glance.
– Rotate items seasonally: Keep current tools accessible while storing others.
Incorporating overhead storage will open up your shed while maintaining organization, creating a more enjoyable workspace.
Fun fact: Up to 50% of a shed’s usable space is wasted on floor clutter, but overhead storage can reclaim it. Install sturdy shelves or a pulley system to tuck rarely used tools up high, freeing floor space for everyday gardening gear.
Dimensions & Size Guide
Standard Sizes & Measurements:
When organizing your tool shed, understanding the standard sizes of tools and storage solutions is vital. Common shelving units are typically 36 inches wide by 72 inches tall. For tools, ensure that larger items, such as shovels and rakes, have at least 6 feet of vertical space for storage. Smaller hand tools can usually fit in 12-inch wide bins or on pegboards. For effective organization, you need at least 24 inches of space in depth for shelves to accommodate various tools and bins comfortably.
For wall-mounted organizers, a minimum wall space of 4 feet in length is usually sufficient to fit a range of hanging tools. Always allow for some room to maneuver, especially if you plan to use rolling tool carts. A clearance of 3 feet around any storage solution will help you access your tools easily.
Quick Reference Table:
Size/Dimension – Best for: [use case], Minimum space needed: [measurement]
– 36″x72″ – Best for: Shelving units, Minimum space needed: 36″x24″
– 12″ Wide Bins – Best for: Small tools, Minimum space needed: 12″x12″
– 4 ft Wall Space – Best for: Wall-mounted organizers, Minimum space needed: 4’x3′
– 6 ft Vertical Space – Best for: Large tools like shovels, Minimum space needed: 6’x2′
– 3 ft Clearance – Best for: Accessing carts and shelves, Minimum space needed: 3’x3′
Space Planning Tips:
1. Measure Twice: Always take measurements before investing in any storage solution. This helps prevent costly mistakes. 🛠️
2. Consider Tool Size: Keep in mind the sizes of your tools. For example, if you have longer tools like pruning saws or rakes, prioritize height in your plans. 🌱
3. Leave Room for Growth: As you add more tools over time, plan for extra space. Consider incorporating adjustable shelving to accommodate new items. 📏
4. Think About Access: Ensure that your most frequently used tools are at the front of shelves or within easy reach. This saves you time when you’re working in the garden. ⏱️
5. Avoid Overcrowding: It can be tempting to fill every nook and cranny, but overcrowding can make it hard to find tools. Aim for a clean, organized look. ❌
Pro Tip: The most crucial measurement to remember is the height clearance for your largest tools. Always allow at least 6 feet to store tall items like rakes and ladders without bending or breaking them. 🌟
7. Tool Holders on Doors

Are you maximizing every inch of your shed? The back of your door can be a prime storage area. Installing tool holders or hanging organizers on the door can significantly boost your organization efforts. These holders can store smaller tools, gloves, and other essentials without taking up valuable floor space.
When choosing door storage, opt for lightweight options to ensure smooth door operation. Look for vertical designs that utilize the full height of the door, and place frequently used items at the top for quick access.
Tips for effective door storage:
– Select lightweight designs: Avoid hindering door movement.
– Maximize height: Use the full door for storage.
– Prioritize access: Keep essential items within reach.
This simple approach can greatly enhance your shed’s organization, maximizing storage without sacrificing space.
8. Rolling Tool Carts

Need flexibility in your tool storage? A rolling tool cart can be the ideal solution. These carts are easily movable, making them perfect for gardening tasks that require tools at different locations. You can keep frequently used items all in one convenient spot.
When selecting a rolling cart, ensure it has a durable construction that can withstand outdoor conditions. Look for sturdy wheels that can navigate various terrains in your garden. A cart with multiple tiers allows for better organization of your tools and supplies.
Consider these features when choosing your rolling cart:
– Sturdy materials: Ensure it withstands outdoor wear.
– Reliable wheels: Choose wheels that navigate easily.
– Multiple levels: Organize tools efficiently on different shelves.
A rolling cart can enhance your shed’s functionality while providing easy access to your gardening tools.
9. Clear Storage Bins

Looking for a straightforward way to organize your shed? Clear storage bins are the solution you need. These bins let you see contents at a glance, saving you time when searching for tools or supplies. Great for everything from seeds to small hand tools, they keep your items organized and easy to find.
To maximize the efficiency of clear bins, ensure you label each one, even though they are transparent. Stack them to optimize vertical space and consider color-coding bins for different categories, such as tools or seeds, for quick identification.
Ways to utilize clear bins effectively:
– Label clearly: Indicate contents for easy tracking.
– Stack efficiently: Utilize vertical space with stacked bins.
– Color-code categories: Assign colors for quick identification.
Clear bins can streamline your gardening process, ensuring every item has a designated spot and enhancing your shed’s organization.
10. Use a Ladder for Vertical Storage

Want a unique storage solution? Old wooden ladders can be repurposed into creative vertical storage. Lean a ladder against a wall, using its rungs to hang tools or placing pots on the steps. This method conserves space while adding rustic charm to your shed.
Ensure the ladder is secure and stable when leaning it against the wall. You can even use it to display plants, creating an eye-catching focal point in your workspace. Opt for a vintage ladder or one with a beautiful finish to enhance your shed’s aesthetic appeal.
Ideas for utilizing a ladder effectively:
– Ensure stability: Check the ladder’s security before use.
– Display plants: Use it to showcase greenery creatively.
– Choose decorative ladders: Enhance your shed’s style with a unique piece.
A ladder can be both a stylish and functional addition to your garden shed organization plans.
11. Tool Pockets on Shed Walls

Are you tired of losing small tools in your shed? Tool pockets attached directly to the walls can provide excellent storage. These fabric or mesh pockets are perfect for holding small items that often get misplaced. They can be easily sewn or purchased and placed in convenient locations throughout your shed.
When selecting tool pockets, choose weather-resistant fabric for durability. Ensure they are within arm’s reach, especially for tools you use frequently. Organizing different categories in separate pockets helps maintain a neat appearance.
Here’s how to effectively use tool pockets:
– Choose durable materials: Opt for weather-resistant fabric for longevity.
– Strategic placement: Keep pockets accessible for easy use.
– Organize by category: Separate tools for a tidy setup.
This storage solution keeps your tools within reach while ensuring an organized workspace in your shed.
12. Hooks and Ropes for Hanging Items

Looking for a classic organization solution? Hooks and ropes are effective for keeping your shed tidy. Hooks can hold tools, hoses, and bags, while ropes can be adapted for larger items. By strategically placing these, you can ensure everything has a designated spot.
Choose heavy-duty hooks that can bear the weight of stored items. Consider various sizes for different tools and supplies, ensuring they are easy to access. Position hooks at a height that is comfortable for you to reach, enhancing usability.
Here are tips for incorporating hooks and ropes:
– Use heavy-duty hooks: Ensure they can support your items securely.
– Vary sizes: Select different hook sizes for various tools.
– Position for access: Place hooks within easy reach.
Incorporating hooks and ropes can keep your shed organized while adding functionality to your gardening storage.
13. Seasonal Tool Rotation

Want to enhance your shed organization? Managing your gardening tools seasonally can make a big difference. As seasons change, so do your gardening needs. By rotating tools based on usage, you can keep clutter to a minimum while ensuring you have what you need.
Schedule regular cleanouts every season to assess which tools are necessary and which can be stored away. Designate specific areas in your shed for each season’s tools to streamline the rotation process. Always clean tools before storing them to protect against damage.
Ways to implement seasonal rotation:
– Schedule cleanouts: Regularly assess tools for relevance.
– Designate storage areas: Create zones for seasonal tools.
– Clean before storage: Maintain tools in good condition.
Adopting a seasonal rotation system can lead to a more efficient gardening process and a well-organized shed.
14. Personalize Your Shed with Decor

While organization is essential, adding personal touches can make your shed feel inviting. Incorporating decor that reflects your personality enhances your space and inspires creativity. Consider adding potted plants, artwork, or DIY projects that showcase your interests.
Choose colors that inspire you and brighten up the environment. Hang artwork that resonates with your gardening passion, and include personal mementos that tell your unique gardening story.
Ways to personalize your shed:
– Choose inspiring colors: Brighten up your space with vibrant hues.
– Display artwork: Hang pieces that reflect your passion.
– Add personal mementos: Showcase items that tell your story.
By personalizing your shed, you’ll create an enjoyable atmosphere that motivates you to spend more time gardening.
15. Regular Maintenance and Upkeep

Want to keep your tool shed organized for the long term? Regular maintenance is key. Establish a routine to clean and reorganize your shed, ensuring everything remains in its designated spot. Setting aside time each month helps maintain order and prevents clutter from accumulating.
Begin with regular cleaning to dust and wipe surfaces, keeping everything looking fresh. Evaluate your storage solutions to determine if they still meet your needs, adjusting as necessary. Declutter by assessing unused items periodically and removing what you no longer need.
Key steps for shed maintenance:
– Regularly clean: Keep surfaces dust-free for a neat appearance.
– Evaluate storage: Check if your systems work effectively.
– Declutter often: Remove unnecessary items to maintain space.
By committing to routine upkeep, you can enjoy an organized and efficient tool shed for years to come.
Conclusion

Creating an organized tool shed can transform your gardening experience into something enjoyable and stress-free.
With these 15 tool shed organization ideas, you’ll be well on your way to maximizing your space and ensuring every tool has its place.
Consider implementing a few or all of these ideas to enjoy a tidy, efficient gardening environment where creativity can flourish.
Note: We aim to provide accurate product links, but some may occasionally expire or become unavailable. If this happens, please search directly on Amazon for the product or a suitable alternative.
This post contains Amazon affiliate links, meaning we may earn a small commission if you purchase through our links, at no extra cost to you.
Frequently Asked Questions
What are the best space-saving ideas for a tool shed to maximize storage and improve tool shed organization ideas?
Start with a plan: map your shed’s layout and designate zones for garden tools, hand tools, and power tools. Then level up with space-saving ideas for sheds like vertical walls and ceiling storage.
Install a sturdy pegboard or slat wall to keep frequently used tools within reach, followed by tool rails and magnetic strips for small items. Add adjustable shelving and stackable bins to use every inch without clutter. Don’t forget ceiling or corner storage for ladders and long-handled tools. Label everything so you can find items fast, making it easy to maintain tool shed organization ideas daily.
How can I improve garden tool organization without a full shed remodel?
Even without a remodel, you can dramatically improve organization with a few smart upgrades. Start by installing a pegboard and some wall-mounted rails to keep frequently used tools at eye level. Add clear, stackable bins or transparent totes for small parts like screws and fasteners, then use zones to separate tools by category: pruning, digging, and irrigation. If space allows, a narrow rolling cart or slim cabinet can store items off the floor. Finish with crisp labels and good lighting to make garden tool organization quick and satisfying.
What shed storage solutions work best for hanging and sorting tools in a vertical shed?
For vertical sheds, lean into wall-mounted systems. Use pegboard or slat walls with heavy-duty hooks for rakes, hoes, and shovels, plus smaller hooks for hand tools. Add magnetic strips for screws, nails, and metal trinkets. Incorporate wall-mounted shelves or baskets at different heights to sort by category, and consider a labeled bin system for small items. Ceiling storage or overhanging racks can hold rarely used supplies. This shed storage solutions setup keeps tools visible, accessible, and ready for any garden task.
What DIY shed organization tips help with efficient tool management in a gardening space?
Think in zones and flows: map where tools are used most and design a path that minimizes steps. Invest in modular DIY shed organization tips like adjustable shelves, removable bins, and clear labeling. Use color-coded labels for tool type and maintenance status, plus a maintenance log to track dull blades or worn handles. Add improved lighting, good ventilation, and weatherproof storage to protect metal tools. Regularly purge unused items to keep your space uncluttered and efficient for tool management.
How can I customize a small vertical tool shed to fit my gardening gear and space?
Start by inventorying every tool and measuring available walls. Then choose slim, modular storage: vertical rails, riveted pegboard, and adjustable shelving that can slide along the wall. Use ceiling shelves or hook systems for long-handled items, plus a few bins for seeds, gloves, and fasteners. Add weatherproof containers and good lighting to make everything easy to find. Label zones clearly to keep garden tool organization consistent, even in a tight space.


![21 Genius Garden Hose Storage Ideas [End the Clutter]](http://nestire.com/wp-content/uploads/2026/04/21-Genius-Garden-Hose-Storage-Ideas-End-the-Clutter-150x150.webp)
![15 Dreamy Canopy Tent Wedding Reception Ideas [Elegant]](http://nestire.com/wp-content/uploads/2026/04/15-Dreamy-Canopy-Tent-Wedding-Reception-Ideas-Elegant-150x150.webp)