
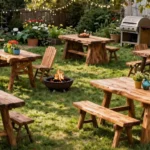
Are you looking to elevate your outdoor space with some stylish yet comfortable seating? This season has me dreaming of lazy afternoons spent lounging in a high top Adirondack chair. The beauty of these chairs lies not only in their classic design but also in their ability to provide the perfect perch for enjoying your garden, sipping a cool drink, or simply basking in the sun. That’s why I created this post — to help you build your very own sustainable outdoor furniture that can transform your backyard into a cozy retreat.
If you’re someone who loves DIY projects, or you enjoy crafting things with your own hands, this guide is just for you. Whether you’re a seasoned woodworker or a beginner, you’ll find plans that suit your skill level. Each project is designed to be easy to follow and offers tips to make your building experience enjoyable. From classic styles to modern twists, I pulled together seven easy high top Adirondack chair plans that are not only eco-friendly but also perfect for enhancing your outdoor comfort.
You’ll get detailed plans for crafting chairs that fit your style and backyard vibe. Each plan comes with step-by-step instructions and materials lists, making your DIY adventure as smooth as possible. Plus, you’ll learn about customizing your chair to make it uniquely yours. So grab your tools and let’s dive into these creative, sustainable chair designs that will make your outdoor area a treasured hangout spot.
Key Takeaways
– Discover seven easy plans for building high top Adirondack chairs that suit various styles, from classic to modern.
– Each plan includes step-by-step instructions, making it simple for both beginners and more experienced builders.
– Learn about eco-friendly materials, including options for upcycling pallets, promoting sustainability in your outdoor furniture.
– Get tips on customizing your chair, such as adding built-in coolers or footrests for added convenience.
– Transform your backyard into an inviting retreat with comfortable seating that encourages relaxation and enjoyment.
1. Classic High Top Adirondack Chair Plan

Crafting a classic high top Adirondack chair brings timeless elegance to your outdoor space. This design perfectly balances comfort and style, allowing you to enjoy serene moments in your garden while soaking in the beauty around you. The taller profile offers a perfect vantage point, making it ideal for watching sunsets or keeping an eye on lively gatherings. Consider using weather-resistant woods like cedar or redwood for durability and aesthetic appeal.
To bring this plan to life, ensure you have the right dimensions for the seat, backrest, and legs. Assemble using screws and wood glue for a sturdy finish that will last through the seasons. A light sanding on edges prevents splinters, while a protective wood finish shields your chair from the elements.
Consider these elements to maximize this design’s charm:
– Pair cedar wood with a natural oil finish
– Install cushions for added comfort and style
– Use a weather-resistant varnish for durability
This classic chair not only enhances your outdoor decor but also creates a cozy nook for summer barbecues and starlit conversations.
Turn your garden into a cozy lookout with high top Adirondack chair plans. These timeless designs pair comfort with eco-friendly materials like cedar or redwood, giving you durable style and a perfect sunset perch. Build smart, finish weather-ready, and enjoy outdoor moments that last.
2. Modern Minimalist High Top Adirondack Chair

If you’re drawn to modern aesthetics, the minimalist high top Adirondack chair is a stunning choice. This design emphasizes simplicity and functional beauty, effortlessly fitting into contemporary outdoor spaces. The clean lines and geometric shapes provide an elegant touch that complements any modern garden or patio.
Utilizing materials such as composite wood or aluminum, this chair withstands outdoor conditions while maintaining its sleek appearance. Precision in cutting and assembling is crucial, so ensure your measurements are spot on for a polished finish.
Enhance your space with these tips:
– Pair with a glass-top outdoor table for a chic look
– Install soft cushions in muted tones for comfort
– Use a matte finish to enhance the modern vibe
This minimalist approach not only elevates your outdoor area but also creates a serene environment for relaxation and entertainment.
Modern outdoor spaces deserve chairs that look effortless and last. With high top adirondack chair plans, choose composite wood or aluminum for a sleek, weather-ready vibe that stays stylish with minimal upkeep.
3. Rustic Farmhouse High Top Adirondack Chair

For those who adore rustic charm, a farmhouse high top Adirondack chair is a perfect match. This design combines sturdy construction with a warm, inviting look, making it an ideal addition to any garden or patio. Using reclaimed wood or distressed finishes adds character, ensuring your chair tells a unique story.
This plan calls for larger wood pieces, emphasizing a robust build. Use screws for a strong assembly and apply wood stain to enhance the rustic appeal. Layering soft cushions can elevate both comfort and style, creating a welcoming atmosphere.
Incorporate these elements for a charming rustic feel:
– Use weathered wood for authenticity
– Pair with plaid or floral cushions for a cozy touch
– Add a wood stain to highlight grain patterns
This farmhouse chair not only beautifies your outdoor space but also serves as a comfortable retreat for family gatherings and quiet evenings.
4. Eco-Friendly High Top Adirondack Chair from Pallets

Creating a high top Adirondack chair from repurposed pallets is an eco-friendly and budget-conscious choice. This project transforms old pallets into a charming seating option that brings character to your garden. The natural imperfections of the wood add an organic touch, making each chair truly one-of-a-kind.
Begin by disassembling the pallets and sanding them down to remove any rough edges. The beauty of this project lies in its unique wood variations, which add personality to your chair. Secure the pieces together with wood screws, and don’t hesitate to use colorful outdoor paint for a lively finish.
Consider these steps for a successful build:
– Use reclaimed pallets for sustainability
– Install bright outdoor paint for a fun look
– Incorporate cushions for comfort and style
This project not only promotes sustainability but also allows you to express your creativity and style in your outdoor space.
❝Fun fact: Pallet wood can cover most of a high top adirondack chair plans with just a few parts, cutting costs by up to 60%. Sand, assemble, and seal for a durable, eco-friendly garden seat you can be proud of.❞
5. High Top Adirondack Chair with Built-in Cooler

Elevate your outdoor enjoyment with a high top Adirondack chair that features a built-in cooler. This design keeps your favorite beverages within arm’s reach, making hot summer days even more pleasant. Modifying the traditional chair plan allows for a compartment in the armrest or beneath the seat to accommodate a small cooler.
Ensure proper insulation for your cooler to keep drinks cold for hours. Using hinges for easy access adds convenience, while a removable cover can enhance functionality. This innovative design blends comfort with practicality, perfect for summer gatherings.
Follow these tips for a successful build:
– Create a cooler compartment in the armrest
– Use hinges for easy access
– Consider adding a removable cover for convenience
This chair not only serves as a stylish seating option but also enhances your outdoor experience, keeping you refreshed while enjoying good company.
6. High Top Adirondack Chair with Footrest

Maximize your outdoor relaxation with a high top Adirondack chair that includes a footrest. This thoughtful design ensures comfort, allowing you to kick back and unwind after a long day. Whether attached or separate, the footrest adds versatility to your outdoor seating.
Using the same wood materials as the chair, adjust the height of the footrest for proper alignment. Follow assembly instructions closely and consider adding extra cushioning to both the chair and footrest for a cozy retreat. This enhancement transforms your space into a relaxing haven.
Incorporate these elements for ultimate comfort:
– Use matching wood materials for a cohesive look
– Add soft cushions for extra comfort
– Ensure proper height alignment for relaxation
This comfortable addition is perfect for enjoying a good book or sipping a refreshing drink while surrounded by nature.
7. Customizable High Top Adirondack Chair Plans

Let your creativity shine with customizable high top Adirondack chair plans! These plans offer the freedom to personalize your design, whether through unique colors, shapes, or added features like cup holders or storage. Choosing your wood type and paint color allows you to tailor the chair to match your outdoor style.
The assembly process mirrors standard plans, but feel free to experiment with different techniques to make it your own. Adding stenciled patterns or carved details can further enhance your chair’s uniqueness. This project is perfect for anyone wanting an outdoor seating solution that reflects their personality.
Explore these ideas to personalize your chair:
– Choose your favorite wood type for a custom look
– Add cup holders for convenience
– Incorporate stenciled patterns for a personal touch
This customizable chair not only serves as a functional piece but also showcases your personal style, making your outdoor area truly special.
Difficulty Rating & Requirements
Overall Difficulty Rating: Medium
Building a high top Adirondack chair can be a rewarding project for DIY enthusiasts. It requires some woodworking skills, making it suitable for those with basic hand tool experience. If you can follow instructions and have a little patience, you’ll enjoy the process and the finished product.
Time Estimate:
⏱ Estimated time: 8-12 hours
Here’s a breakdown of the phases you might encounter:
1. Planning & Material Gathering: 2-3 hours
2. Cutting & Assembling Parts: 4-6 hours
3. Sanding & Finishing: 2-3 hours
These phases may vary based on your skill level and the specific plan you choose.
Skill Requirements:
– Required skills: Basic woodworking skills, ability to use hand and power tools.
– Beginner-friendly: Yes. If you’re new to woodworking, you can learn basic skills during this project. Simple cuts and assembly techniques are easy to grasp.
– Skills that can be learned: You’ll learn how to read plans, make precise cuts, and finish wood surfaces. Some tasks might require additional practice, like sanding or applying finishes evenly.
Tools & Materials Needed:
🧰 Essential items checklist:
– Circular saw (required) – for making straight cuts in wood.
– Drill (required) – for drilling holes and driving screws.
– Screwdriver (required) – for assembly.
– Sandpaper (required) – for smoothing surfaces before finishing.
– Wood glue (optional) – for added strength in joints.
– Clamps (optional) – to hold pieces together while drying.
– Measuring tape (required) – for accurate measurements.
– Wood stain or paint (optional) – for finishing your chair to match your outdoor decor.
Gathering these tools can help you tackle this project with ease.
Step-by-Step Overview:
1. Planning & Material Gathering (2-3 hours): Start by choosing one of the plans. Make a materials list and purchase everything you need. Measure your workspace to ensure you have enough room to work.
2. Cutting & Assembling Parts (4-6 hours): Follow your chosen plan. Cut the wood pieces according to the measurements. Assemble them using screws and wood glue where necessary. Take your time to ensure everything fits correctly.
3. Sanding & Finishing (2-3 hours): Sand all surfaces to make them smooth. This reduces splinters and helps the finish adhere better. Choose a wood stain or paint to protect your chair from the elements. Allow it to dry completely before using it.
Cost Comparison: Professional vs DIY:
Hiring a professional to build a high top Adirondack chair can cost anywhere from $300 to $600, depending on materials and labor. If you choose to tackle it yourself, you could spend around $100 to $200 on materials. Building it yourself not only saves you money but also adds a personal touch to your outdoor space.
Deciding whether to DIY or hire someone can depend on your budget and time constraints. If you enjoy woodworking and have the necessary tools, making your own chair can be a fun and fulfilling project.
Conclusion

Building your own high top Adirondack chairs not only enhances your outdoor living space but also adds a personal touch to your garden.
With these seven easy plans, you can create a variety of beautiful and sustainable outdoor furniture pieces that perfectly fit your needs.
So roll up your sleeves, grab your tools, and let your crafting journey begin! The perfect outdoor oasis is just a project away.
Note: We aim to provide accurate product links, but some may occasionally expire or become unavailable. If this happens, please search directly on Amazon for the product or a suitable alternative.
This post contains Amazon affiliate links, meaning we may earn a small commission if you purchase through our links, at no extra cost to you.
Frequently Asked Questions
What are high top adirondack chair plans and why are they a good fit for eco-friendly outdoor furniture?
Think of these as ready-to-build designs for a comfortable, elevated seat in your garden.
High top adirondack chair plans guide you through lumber sizes, joints, and assembly so you get a sturdy chair with plenty of leg clearance and a better view of your plants.
The eco-friendly angle comes from choosing sustainable wood, low-VOC finishes, and simple, long-lasting construction.
In the article, the 7 plans cover beginner-friendly to more advanced projects, all designed to minimize waste and maximize outdoor durability. If you’re pursuing backyard seating ideas, these plans are a great starting point for DIY Adirondack chair projects and other easy chair designs.
Are these high top adirondack chair plans suitable for beginners looking to build a DIY Adirondack chair?
Absolutely. Each plan comes with a cut list, tool list, and step-by-step instructions that break the project into manageable woodworking tasks.
For beginners, start with simpler components, practice dry-fitting, and predrill to avoid splitting wood.
The article highlights options that use common lumber sizes, making it friendly for DIY Adirondack chair projects and other easy chair designs. Remember to wear safety gear and work in a well-ventilated space.
What materials and finishes keep these chairs sustainable and durable in a garden?
Look for sustainably sourced wood (cedar, redwood, or responsibly harvested lumber) or reclaimed lumber.
Pair with a water-based, low-VOC finish to protect against sun and rain without toxic fumes.
The plans specify stock thickness and joinery that optimize durability while minimizing waste. Use exterior-grade hardware and a weatherproof sealant, and re-seal every couple of years for long-lasting outdoor furniture plans and reliable garden seating.
What tools and a simple workflow do I need to build a high top Adirondack chair from these plans?
A typical toolkit includes a circular or miter saw, drill/driver, screwdriver, clamps, sandpaper or a sander, a tape measure, a square, and safety gear.
Workflow: prep the lumber, cut parts to plan, dry-fit to check fit, assemble with glue and screws, sand smooth, then apply your eco-friendly finish.
Following the plan step-by-step makes it easy to produce a sturdy chair that fits your space and your outdoor furniture plans.
How can I customize these high top Adirondack chair plans for different backyard seating ideas and weather conditions?
Adjust seat height and back angle in the plan to suit comfort and space.
Consider a taller back for sunrooms or a shorter leg for a more compact look.
Choose stain colors that match your garden palette and add cushions with weather-resistant fabric for extra comfort, while keeping maintenance in mind. Regular cleaning and re-sealing protect against rain, sun, and temperature swings. This approach works well with backyard seating ideas and outdoor furniture plans you can tweak without starting from scratch.


![21 Genius Garden Hose Storage Ideas [End the Clutter]](https://nestire.com/wp-content/uploads/2026/04/21-Genius-Garden-Hose-Storage-Ideas-End-the-Clutter-150x150.webp)
![15 Dreamy Canopy Tent Wedding Reception Ideas [Elegant]](https://nestire.com/wp-content/uploads/2026/04/15-Dreamy-Canopy-Tent-Wedding-Reception-Ideas-Elegant-150x150.webp)